Welcome to my creative outlet

I believe that every person needs some form of creative outlet. This is mine, my personal recipe's, small projects and ramblings from life's lessons.

Monday, March 26, 2012

Noah turned 1 year old!


On March 9th 2012 we celebrated our second child's 1st birthday! Noah Jaden Marshall is our little miracle baby. It took 2 1/2 years of trying and several unsuccessful pregnancies before God blessed us with this little gift!


Celebrating Noah's birthday brought back a flood of emotions revolving his pregnancy, the hormone therapy, preterm labor caused by a car wreck and then a few seconds away from a C-section deciding he finally was ready to drop down and come into the world!  This year has been full of so many firsts for him and its been wonderful to celebrate them as a family. His big sister, Nadine, enjoys him immensely. Their relationship is so special, I can't wait to watch them grow up together. It's funny how celebrating this amazing year also brings mixed emotions, I'm not ready for my baby to be a toddler and he's only a couple months away from no longer being a baby and now being a little toddler boy. I know I can't keep him from growing, and there are going to be some incredible milestones along the way but I sure am going to
miss the newborn smell, the wondrous look as he experiences the world for the first time, and being able to hold him in just one arm.
On the other hand I'm on the edge of my seat waiting for him to walk, loving all of the new words he's learning and can't wait for the weather to get better for us to head out to the park, go camping and walk through the zoo!
Anyway, Noah and his birthday buddies enjoyed all the bubbles, the bouncy balls and the cake. It was a wonderful time. We are truly blessed to have such incredible children, supportive friends and loving family.

Cheers to another beautiful year full of firsts with this gift from God, and his equally special big sister who will be turning six years old in June!


Thursday, March 22, 2012

Start it and forget it Chili Verde (Dutch oven)

Do you ever go to the grocery store with a specific list and walk away with some bargain because it was a BARGAIN and then have to figure out how to use it? That was me ;) Below is one of 3 packs of boneless pork chops I found for an 80% discount and couldn't pass up! Problem? Umm.. my husband hates pork! haha.. My husband thinks that pork is chewy and doesn't have a great flavor, I was determined to prove him wrong so I made a slow cooked, lick the bowl, delicious and easy chili verde.
Really, who could pass this up for $6?

First and foremost make sure your boneless pork chops are thawed, you can use bone in but it takes more effort to take all the bones out before shredding.
Things you need:
olive oil
2 cans of whole green chiles (Fire roasted)
1 can Green Chili enchilada sauce (mild)
1 jar of salsa verde (mild)
3-4 lbs of Boneless pork chops

Seasoning:
pepper
cumin
onion powder
garlic powder
paprika

Are you ready for some easy slow cooking?
Spread a dash of olive oil into the bottom of your dutch oven and heat on the stove top to medium-high. Pre-heat the oven to 350 degrees.
Dust the pork chops with the seasoning (DO NOT USE SALT) on both sides.
Sear both sides of each the chops and leave in the bottom of the Dutch and add all the remaining ingredients (whole green chilis, enchilada sauce and salsa verde). Stir in the sauce to pick up all the yummy browning off the bottom of the pan. Cover the Dutch oven and place in the oven for 4 hours.

4 hours may seem like a long time but I was able to watch a movie, do the dishes, put laundry away, build a snow man and play with the baby. You put dinner in and walk away until it is ready!

........4 hours later........

Remove your dutch oven from the oven to the stove top and lift the lid. The pork chops should so tender that all you have to do is pinch them with some tongs and they will fall apart, making "shredding" so easy

I use my chili verde in burritos, nachos, huevos racheros, and taco salad. It's so tasty!


Tuesday, March 13, 2012

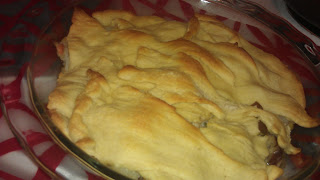
Not your Grandma's pot pie! (super easy)

I get bored of eating the same thing over and over again don't you? I am not a fan of frozen dinners but have always been intrigued by chicken pot pie. When I was little my grandma made chicken pot pie one summer when we were visiting in Missouri. In true southern fashion it had tons of butter, and a crust made of half a box of bisquick lol. I have never tasted anything so delicious (although I suffered from the butter). I was determined to make a lighter, easier version in my semi-homemade way.

Things you need:
Left over whole chicken (I pick it clean for dinner and lunch then the next day use it in this recipe!)
1 roll of crescent rolls (the safeway brand is dairy free)
3 left over baked red potatoes from the previous night's chicken dinner
2 cups of mixed frozen veggies

Let's get started! Throw your chicken carcass in a medium sized soup pot with just enough water or low sodium chicken broth to barely cover the carcass. Put a lid on it and simmer on medium heat until the remaining chicken meat falls off the bone. (This can take between 30 minutes to an hour or longer depending on how big your chicken was and how much meat was left on the carcass).
*Note* If you don't have left over  baked potatoes then use this time to wrap your washed/salted&peppered red potatoes in the oven now so we can assemble the potpie quickly.

*Preheat your oven to 350 degrees F.
Ok remove the carcass from the liquid (let the stock continue to simmer and reduce) and remove the chicken meat from the bones, if you've simmered long enough it should practically fall off or already be in the stock pot. Throw away the bones and inedible stuff like fatty clumps, gristle or chewy skin.

Add the chicken back to the stock, cube your potatoes and add the potatoes and veggies to the mix. Dump the mixture into a pie dish (if the stock has been reduced properly it will be thick like a hash)
Unroll your crescent rolls and layer over the filling.

I layer the crescent rolls from tip to tail

Keep an eye on your dish, Baking time should be about 13 minutes or until  it is evenly  golden brown across the  top.
Cool for about 3 min and serve! It's delicious and much lighter in calories since there isn't a gravy on the inside or double layer crust!