Welcome to my creative outlet

I believe that every person needs some form of creative outlet. This is mine, my personal recipe's, small projects and ramblings from life's lessons.
Showing posts with label easy. Show all posts

Wednesday, November 21, 2012

Never eat cranberry sauce out of a can ever again (gluten free)

                                                            Holiday Cranberry Sauce
I have a friend that told me "if it does't resemble a can it's not cranberry sauce". He was joking but the thing is I think too many people assume that the cranberry, sugar filled gelatinous stuff is what holiday traditions are are all about. They are so WRONG, you all have been missing out on some delicious stuff, and excellent left over turkey sandwich condiment bliss.

Things you're going to need
1) blender, vitamix, or food processor
2) 2 bags of raw cranberries
3) 40 ounces of quality orange juice
4) 1/3 cup brown sugar
 5) teaspoon of orange zest
In a large stew pot (that has a lid) add your 2 bags of cranberries, 40 oz of orange juice and orange zest. Set on medium/high and boil until cranberries are tender and starting to burst.
stir in 1/3 cup brown sugar (you can add additional sugar if you prefer sweeter) and reduce heat to simmer for 20 minutes stirring occasionally.
Remove from heat and set aside with lid off for at least an hour then with a slotted spoon scoop the cranberries into a blender/vitamix/food processor and puree until smooth (add additional juice from pot if mixture is too thick).

Refrigerate and enjoy!

Want to know what to do with the left over juices? Strain with a small hole colander and use for bellini mix with a sparkling wine of your choice =) Also works well with club soda for kid friendly drinks.


Wednesday, April 18, 2012

Low Calorie "Street Tacos" at home

Summer is quickly approaching, and even here in Oregon with the rain and overcast its starting to warm up for outdoor cooking! This week we grilled several chicken breasts and put them in the fridge to use for tacos, salads, sandwiches and etc. so we could have lean cooked meat with out heating up the whole dwelling.

Things you need:
Chicken Breasts (3-4)
Lettuce
Tomatoes
Salsa
Fire Roasted Peppers
Tortillas

Seasonings:
Poultry seasoning, salt, pepper, cumin


Grill the chicken breasts after lightly seasoning with poultry seasoning , salt, pepper and  cumin. After about 15-25 minutes of grilling let the chicken rest for 5 minutes then shred or cut into strips.

prepare your toppings! We used lettuce, canned fire roasted peppers, tomatoes and salsa. Additional toppings to consider would be black olives, onions, cheese, sour cream and jalapenos.

Depending on your gluten tolerance, you can use a variety of tortillas for gluten free I like Udi's, but for those of you wheat eaters I prefer these half corn half whole grain tortillas (heat up on a stove or in the microwave).

Assemble to your liking and enjoy! Simple, delicious, and low calorie meal the whole family will enjoy!

Thursday, March 22, 2012

Start it and forget it Chili Verde (Dutch oven)

Do you ever go to the grocery store with a specific list and walk away with some bargain because it was a BARGAIN and then have to figure out how to use it? That was me ;) Below is one of 3 packs of boneless pork chops I found for an 80% discount and couldn't pass up! Problem? Umm.. my husband hates pork! haha.. My husband thinks that pork is chewy and doesn't have a great flavor, I was determined to prove him wrong so I made a slow cooked, lick the bowl, delicious and easy chili verde.
Really, who could pass this up for $6?

First and foremost make sure your boneless pork chops are thawed, you can use bone in but it takes more effort to take all the bones out before shredding.
Things you need:
olive oil
2 cans of whole green chiles (Fire roasted)
1 can Green Chili enchilada sauce (mild)
1 jar of salsa verde (mild)
3-4 lbs of Boneless pork chops

Seasoning:
pepper
cumin
onion powder
garlic powder
paprika

Are you ready for some easy slow cooking?
Spread a dash of olive oil into the bottom of your dutch oven and heat on the stove top to medium-high. Pre-heat the oven to 350 degrees.
Dust the pork chops with the seasoning (DO NOT USE SALT) on both sides.
Sear both sides of each the chops and leave in the bottom of the Dutch and add all the remaining ingredients (whole green chilis, enchilada sauce and salsa verde). Stir in the sauce to pick up all the yummy browning off the bottom of the pan. Cover the Dutch oven and place in the oven for 4 hours.

4 hours may seem like a long time but I was able to watch a movie, do the dishes, put laundry away, build a snow man and play with the baby. You put dinner in and walk away until it is ready!

........4 hours later........

Remove your dutch oven from the oven to the stove top and lift the lid. The pork chops should so tender that all you have to do is pinch them with some tongs and they will fall apart, making "shredding" so easy

I use my chili verde in burritos, nachos, huevos racheros, and taco salad. It's so tasty!


Tuesday, March 13, 2012

Not your Grandma's pot pie! (super easy)

I get bored of eating the same thing over and over again don't you? I am not a fan of frozen dinners but have always been intrigued by chicken pot pie. When I was little my grandma made chicken pot pie one summer when we were visiting in Missouri. In true southern fashion it had tons of butter, and a crust made of half a box of bisquick lol. I have never tasted anything so delicious (although I suffered from the butter). I was determined to make a lighter, easier version in my semi-homemade way.

Things you need:
Left over whole chicken (I pick it clean for dinner and lunch then the next day use it in this recipe!)
1 roll of crescent rolls (the safeway brand is dairy free)
3 left over baked red potatoes from the previous night's chicken dinner
2 cups of mixed frozen veggies

Let's get started! Throw your chicken carcass in a medium sized soup pot with just enough water or low sodium chicken broth to barely cover the carcass. Put a lid on it and simmer on medium heat until the remaining chicken meat falls off the bone. (This can take between 30 minutes to an hour or longer depending on how big your chicken was and how much meat was left on the carcass).
*Note* If you don't have left over  baked potatoes then use this time to wrap your washed/salted&peppered red potatoes in the oven now so we can assemble the potpie quickly.

*Preheat your oven to 350 degrees F.
Ok remove the carcass from the liquid (let the stock continue to simmer and reduce) and remove the chicken meat from the bones, if you've simmered long enough it should practically fall off or already be in the stock pot. Throw away the bones and inedible stuff like fatty clumps, gristle or chewy skin.

Add the chicken back to the stock, cube your potatoes and add the potatoes and veggies to the mix. Dump the mixture into a pie dish (if the stock has been reduced properly it will be thick like a hash)
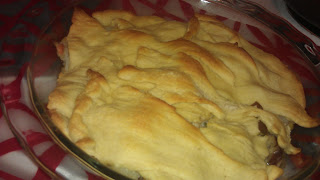
Unroll your crescent rolls and layer over the filling.

I layer the crescent rolls from tip to tail

Keep an eye on your dish, Baking time should be about 13 minutes or until  it is evenly  golden brown across the  top.
Cool for about 3 min and serve! It's delicious and much lighter in calories since there isn't a gravy on the inside or double layer crust!


Saturday, February 11, 2012

Easiest Salmon dish that even non-seafood eaters will love


I am going to be honest with you...I'm not much of a seafood person. I should be put to shame for being a self proclaimed foodie that does not like seafood! On the other hand, my husband loves salmon. I had to create a salmon dish that I was willing to eat with Karl and that Nadine would eat too. After a couple tries I'm pretty sure this is the easiest and yummiest salmon dish I've ever had.

2 bonesless salmon steaks (about 4 oz each) preferebly fresh not frozen
4 tbs of orange marmalade
4 tbs of orange juice
1 bag of mixed veggies (either the "steam ready" or frozen)
season to taste: salt, pepper, thyme, rosemary, garlic powder, onion powder

Take a large sheet of foil and line the inside of a cake pan or cookie sheet,
drizzle foil with a light amount of olive oil
place salmon steaks on foil (scale side down) with room to curl up the foil for making a packet
Season salmon steaks, top each steak with 2 tbs of orange marmalade
Pour the bag of veggies over the salmon and season lightly
add 4 tbs of OJ for moisture
roll up the sides of the packet (adding more foil if needed to cover the whole thing), seal tightly
place in the preheated oven 350 deg for 45 minutes
remove from oven and serve over rice or as is =) for super easy and yummy rice I get the the frozen jasmine rice it only takes 3 minutes to microwave!

Each serving has less then 300 calories!

Wednesday, February 8, 2012

I love Pinterest.com and I get inspired to try crafts, clothing styles, recipes and etc. Today I was inspired by all the braided hair styles being pinned. I went to work trying out hair styles on my mini me (Nadine). 
I separated Nadine's hair into three sections (crown, middle and bottom) I did a loose french braid on the bottom and middle sections going in a down angle. Then I combined the two sections into one braid in and upward motion...

I continued the french braid up the side of her head to the crown and back down until  all loose hair was in the french braid, with the last 4 inches of hair I did a standard braid and tucked it behind the braided crown of her head and fastened with bobby pins and hair spray.

I chose to do it in a beehive style bump but the same process could be done in a tighter braid to not have the beehive affect. The volume is very cute as is or with a headband.

I used 5 bobby pins, 3 squirts of hair spray and it took a total of 15 minutes =) I think this is a keeper hair style for our next family pictures!

Monday, February 6, 2012

Waffle irons are good for more than just waffles...


I am all about easy ways to make yummy food. Today I made waffles for breakfast and at lunch time my waffle maker was still on the counter. I of course wanted to avoid making additional dishes so I opted to use the waffle iron as a panini press. Our grilled cheese sandwiches turned out crispy and our daughter got a kick out of the pattern.

Butter or olive oil on both sides of the bread, my kids did plain grilled cheese but I opted for goat cheese, fresh basil and sprinkled garlic powder on the outside of the bread as well. (DELISH!)
There you go folks! Easy and quick clean up!


Sunday, February 5, 2012

Up-cycled lace infinity scarf

About an hour ago this was a plain black T-shirt and 1/4 of a yard of lace from the clearance section at the craft store~

I started with a T-shirt and cut off  just below the armpit all the way across and then cut off the bottom hem to make a tube of fabric.

Then cut open the tube on just one side.

line up the lace along the tub and cut 2/3 the length of lace as the jersey material. Sew the ends together to make one solid circle.

Take the hem you trimmed off of the bottom of the "tube" and cut in to two sections. Run the thread all the way through  and then cinch it together to make the shape of a flower. Sew the bottom to keep the flower intact.


(My mom graciously modeled the scarf for me)  Attach the flowers so  they tie in the lace and jersey material together.  I  chose to tack the two pieces together so I wouldn't have to re-adjust the scarf every time I put it on but you can do what ever you want =)

Total time: 1 hour (hand sewn)
Total cost: $2.50 

Saturday, January 28, 2012

Grilled Chicken with Pico De Gallo and Creamy Goat Cheese Rice

I am always looking for low calorie easy dishes that we can throw on the BBQ and this is one of my absolute favorites! It has a juicy chicken breast with a risoto style easy rice base and zesty Pico De Gallo to add freshness to the dish. Yum!

Ingredients:
3 Chicken breast
2 cups minute rice
2 cups Chicken Stock
5 tbs Creamy plain Chevre (I like Fairview Goat Farm's)
Pico De Gallo (I get mine pre-made from the produce section in the grocery store)

Seasonings:
Rosemary
Garlic powder
Salt
Pepper
Cumin

Instructions:
Season the chicken breasts on both sides and either grill on a cast iron pan or out door BBQ. Cook 2 cups of minute rice with 2 cups of chicken stock. Combine cooked rice with Chevre and lightly season with pepper and salt.
Assemble by putting rice on plate top with the chicken breast and garnish with Pico de Gallo.


Thursday, January 19, 2012

Creamy Chicken w/ Veggies and Rice (Dairy free and gluten free) AKA The post that keeps getting deleted haha!

Before I start this blog post (for the 3rd time!) I have to say that I must not adapt well to new things. Why might you ask would I bring this up? I have posted this recipe on two other separate occasions and instead of "edited" them to add tags I deleted the whole post! lol TWICE! OK, this time... you all will get to learn the deliciousness and ease of this recipe.

Items to grab:
Gluten free onion soup mix (if you don't need gluten free then try Lipton's Onion Soup Mix)
4 cups of water
4 chicken breast
1 tlbs of crushed garlic
1/2 tbs of onion powder
1 tub of Tofuti Supreme Cream (or 8oz regular sour cream)
2 lbs of Earth Balance dairy free margarine (or regular butter)
1 small bag of frozen veggies
3 cups of uncooked rice (I like to use minute rice)
Salt and Pepper to taste

Simmer the chicken breasts in the water/garlic/onion soup mix until cooked all the way through. Then  pull the breasts from the soup mix and cut into bite size pieces.


Add the frozen veggies and simmer until cooked all the way through.

Add the supreme cream, margarine, and seasonings and bring to a simmer until sauce thickens  to  a gravy like  density. While your sauce is reducing take this time to prepare your minute rice.

Scoop the mix over the rice and enjoy! Makes for great left overs! and you can  re-purpose the chicken mix into a chicken casserole by using gluten free noodles a corn flake crumble and bake until the corn flake crumble is golden and crispy!

Sunday, December 4, 2011

Apple and herb turkey (yumm!)

Even though it feels like it was just Thanksgiving, Christmas is right around the corner! I have a super recipe for an easy and moist turkey.
Ingredients:
Defrosted Turkey
1 Green apple
1 sweet onion
1 bunch of poultry herbs
     Thyme, rosemary, sage and parsley.
(check out the prepacked fresh herbs in the produce section at Safeway, FredMyer, or your local grocery store)
5 tbs of melted dairy free margarine
Salt, pepper, paprika, garlic powder, onion powder

In a large foil pan or roasting pan take the giblets out of the neck cavity of the turkey (it is super important these are removed so the packaging doesn't contaminate the bird!) either throw the giblets away or start simmering them on low in a low sodium chicken stock. Stuff the herbs, apple (halved) and onion (quartered) in to the turkey's cavity.
This is a 14lb bird, takes about 4 hours on 375 degrees Fahrenheit
The internal temp should be no lower than 180 degrees Fahrenheit


 Cover the skin of the turkey with the melted margarine and sprinkle the seasons to taste. Go light on the paprika because it will burn easily.

Cover the whole thing in foil for the first 3 hours (or depending on the size of your bird for the first 3/4 of the baking time per instructions on the packaging) After 3/4 of the baking time remove foil and use part of it to create an upside down V to place over the turkey breast (this helps keep the white meat moist while the dark meat is still finishing up) Every 15 minutes or so spoon the drippings in the bottom of the pan on top of the bird to retain moisture. Once the nifty red button has popped or the internal temp is at 180 degrees Fahrenheit remove that bird from the oven. For optimum moisture let the turkey rest for an hour before carving. I like to utilize the resting period to make gravy from the drippings and prepare my sides.

During the last hour of baking I like to throw in some red potatoes for convenience. You can eat them
as baked potatoes or peal and mash them.

Voila! She's beautiful and moist!

HINT: Save your apple and onion from the chest cavity for a delicious left over wrap/sandwich the next day.

For an easy and scrumptious lunch take your left over turkey, a couple slices of the cooked apple, a couple of layers of the baked onion, spread a thin layer of Chevre or cream cheese on the inside of a gluten free tortilla or bread (I really enjoy Udi's gluten free bread products!).
That's it! Enjoy!